深层链接
本指南将描述如何配置你的应用以处理各种平台上的深层链接。要处理传入链接,你需要处理两种情况:
¥This guide will describe how to configure your app to handle deep links on various platforms. To handle incoming links, you need to handle 2 scenarios:
-
如果应用之前未打开,则深层链接需要设置初始状态
¥If the app wasn't previously open, the deep link needs to set the initial state
-
如果应用已打开,则深层链接需要更新状态以反映传入链接
¥If the app was already open, the deep link needs to update the state to reflect the incoming link
React Native 提供了 Linking 来获取传入链接的通知。React Navigation 可以与 Linking 模块集成来自动处理深层链接。在 Web 上,React Navigation 可以与浏览器的 history API 集成来处理客户端的 URL。请参阅 配置链接 以了解有关如何在 React Navigation 中配置链接的更多详细信息。
¥React Native provides a Linking to get notified of incoming links. React Navigation can integrate with the Linking module to automatically handle deep links. On Web, React Navigation can integrate with browser's history API to handle URLs on client side. See configuring links to see more details on how to configure links in React Navigation.
虽然你不需要使用 React Navigation 中的 linking 属性,并且可以通过使用 Linking API 并从那里导航来自行处理深层链接,但它会比使用 linking 属性复杂得多,后者可以为你处理许多边缘情况。所以我们不建议你自己实现。
¥While you don't need to use the linking prop from React Navigation, and can handle deep links yourself by using the Linking API and navigating from there, it'll be significantly more complicated than using the linking prop which handles many edge cases for you. So we don't recommend implementing it by yourself.
下面,我们将完成所需的配置,以便深度链接集成正常工作。
¥Below, we'll go through required configurations so that the deep link integration works.
设置深度链接
¥Setting up deep links
- Expo
- Community CLI
配置 URL scheme
¥Configuring URL scheme
首先,你需要为你的应用指定一个 URL 方案。这对应于 URL 中 :// 之前的字符串,因此如果你的方案是 example,那么指向你的应用的链接将为 example://。你可以通过在方案密钥下添加一个字符串来在 app.json 中注册方案:
¥First, you will want to specify a URL scheme for your app. This corresponds to the string before :// in a URL, so if your scheme is example then a link to your app would be example://. You can register for a scheme in your app.json by adding a string under the scheme key:
{
  "expo": {
    "scheme": "example"
  }
}
接下来,安装 expo-linking,我们需要它来获取深层链接前缀:
¥Next, install expo-linking which we'd need to get the deep link prefix:
npx expo install expo-linking
然后你可以使用 Linking.createURL 获取应用的前缀:
¥Then you can use Linking.createURL to get the prefix for your app:
const linking = {
  prefixes: [Linking.createURL('/'),
};
更多详细信息请参见下方的 配置 React Navigation。
¥See more details below at Configuring React Navigation.
Why use Linking.createURL?
由于 Expo 开发客户端 和独立应用的方案不同,因此必须使用 Linking.createURL。
¥It is necessary to use Linking.createURL since the scheme differs between the Expo Dev Client and standalone apps.
app.json 中指定的方案仅适用于独立应用。在 Expo 客户端应用中,你可以使用 exp://ADDRESS:PORT/--/ 进行深层链接,其中 ADDRESS 通常是 127.0.0.1,PORT 通常是 19000 - 当你运行 expo start 时,会打印 URL。Linking.createURL 函数将其抽象出来,这样你就不需要手动指定它们。
¥The scheme specified in app.json only applies to standalone apps. In the Expo client app you can deep link using exp://ADDRESS:PORT/--/ where ADDRESS is often 127.0.0.1 and PORT is often 19000 - the URL is printed when you run expo start. The Linking.createURL function abstracts it out so that you don't need to specify them manually.
如果你使用通用链接,则还需要将你的域添加到前缀中:
¥If you are using universal links, you need to add your domain to the prefixes as well:
const linking = {
  prefixes: [Linking.createURL('/'), 'https://app.example.com'],
};
iOS 上的通用链接
¥Universal Links on iOS
要在 Expo 应用中设置 iOS 通用链接,你需要配置 应用配置 以包含关联的域和权限:
¥To set up iOS universal Links in your Expo app, you need to configure your app config to include the associated domains and entitlements:
{
  "expo": {
    "ios": {
      "associatedDomains": ["applinks:app.example.com"],
      "entitlements": {
        "com.apple.developer.associated-domains": ["applinks:app.example.com"]
      }
    }
  }
}
你还需要在服务器上设置 相关字段。
¥You will also need to setup Associated Domains on your server.
详细信息请参见 Expo 关于 iOS 通用链接的文档。
¥See Expo's documentation on iOS Universal Links for more details.
Android 应用链接
¥App Links on Android
要在 Expo 应用中设置 Android 应用链接,你需要配置 应用配置 以包含 intentFilters:
¥To set up Android App Links in your Expo app, you need to configure your app config to include the intentFilters:
{
  "expo": {
    "android": {
      "intentFilters": [
        {
          "action": "VIEW",
          "autoVerify": true,
          "data": [
            {
              "scheme": "https",
              "host": "app.example.com"
            }
          ],
          "category": ["BROWSABLE", "DEFAULT"]
        }
      ]
    }
  }
}
你还需要通过托管数字资源链接 JSON 文件,在你的网站和意图过滤器之间建立 声明关联 连接。
¥You will also need to declare the association between your website and your intent filters by hosting a Digital Asset Links JSON file.
详细信息请参见 Expo 关于 Android 应用链接的文档。
¥See Expo's documentation on Android App Links for more details.
在 iOS 上设置
¥Setup on iOS
让我们将原生 iOS 应用配置为基于 example:// URI 方案打开。
¥Let's configure the native iOS app to open based on the example:// URI scheme.
你需要按照 此处 中的说明,将 LinkingIOS 文件夹添加到标头搜索路径中。接下来,你需要将以下代码添加到你的 AppDelegate.swift 或 AppDelegate.mm 文件中:
¥You'll need to add the LinkingIOS folder into your header search paths as described here. Then you'll need to add the following lines to your or AppDelegate.swift or AppDelegate.mm file:
- Swift
- Objective-C
func application(_ app: UIApplication, open url: URL, options: [UIApplication.OpenURLOptionsKey : Any] = [:]) -> Bool {
  return RCTLinkingManager.application(app, open: url, options: options)
}
#import <React/RCTLinkingManager.h>

- (BOOL)application:(UIApplication *)application
   openURL:(NSURL *)url
   options:(NSDictionary<UIApplicationOpenURLOptionsKey,id> *)options
{
  return [RCTLinkingManager application:application openURL:url options:options];
}
如果你的应用使用 通用链接,你还需要添加以下代码:
¥If your app is using Universal Links, you'll need to add the following code as well:
- Swift
- Objective-C
func application(
  _ application: UIApplication,
  continue userActivity: NSUserActivity,
  restorationHandler: @escaping ([UIUserActivityRestoring]?) -> Void) -> Bool {
    return RCTLinkingManager.application(
      application,
      continue: userActivity,
      restorationHandler: restorationHandler
    )
  }
- (BOOL)application:(UIApplication *)application continueUserActivity:(nonnull NSUserActivity *)userActivity
 restorationHandler:(nonnull void (^)(NSArray<id<UIUserActivityRestoring>> * _Nullable))restorationHandler
{
 return [RCTLinkingManager application:application
                  continueUserActivity:userActivity
                    restorationHandler:restorationHandler];
}
现在你需要将该方案添加到你的项目配置中。
¥Now you need to add the scheme to your project configuration.
最简单的方法是使用 uri-scheme 包运行以下命令:
¥The easiest way to do this is with the uri-scheme package by running the following:
npx uri-scheme add example --ios
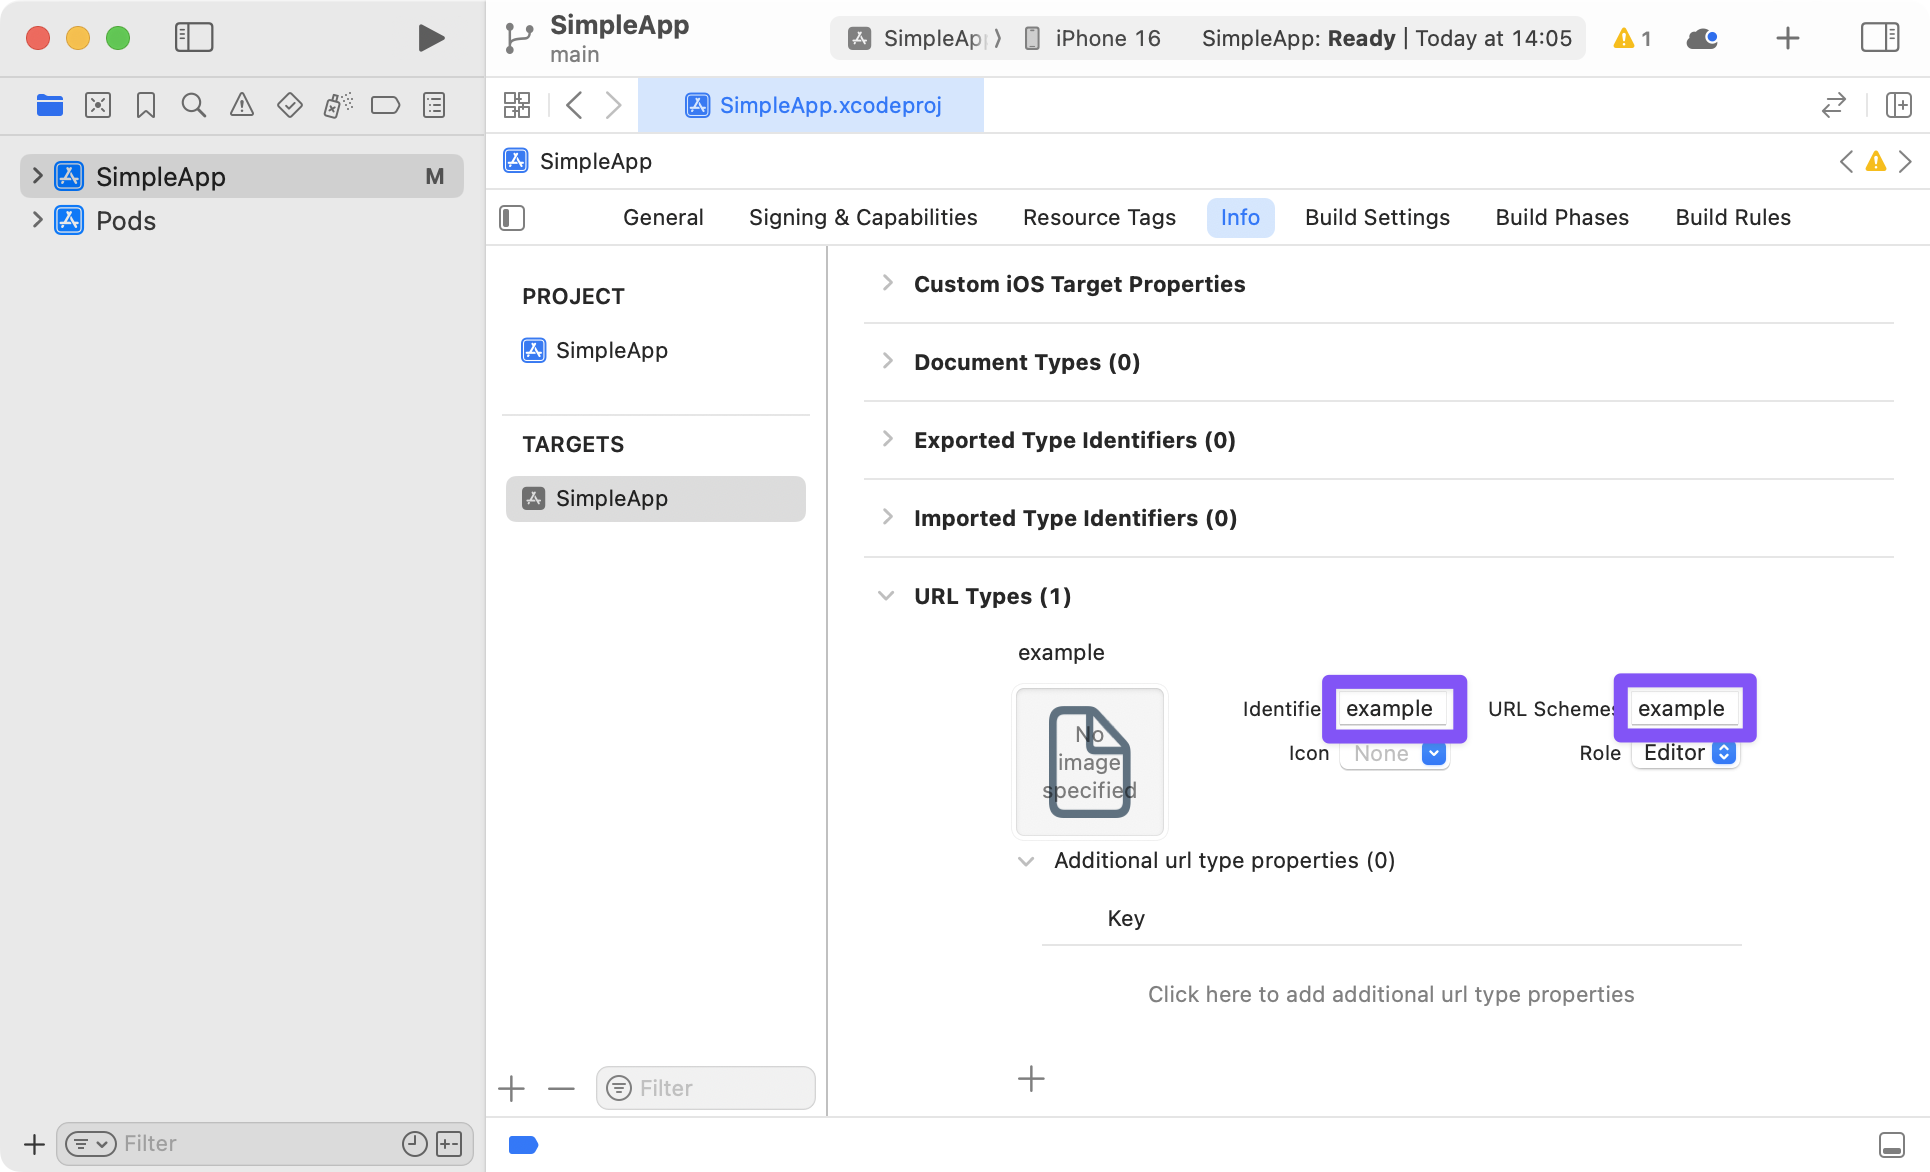
如果你想手动执行此操作,请在 Xcode 中打开项目(例如 SimpleApp/ios/SimpleApp.xcworkspace)。在侧栏中选择项目并导航到信息选项卡。向下滚动到 "网址类型" 并添加 1。在新的 URL 类型中,将标识符和 URL 方案设置为你所需的 URL 方案。
¥If you want to do it manually, open the project (e.g. SimpleApp/ios/SimpleApp.xcworkspace) in Xcode. Select the project in sidebar and navigate to the info tab. Scroll down to "URL Types" and add one. In the new URL type, set the identifier and the URL scheme to your desired URL scheme.
为了确保通用链接在你的应用中工作,你还需要在服务器上设置 相关字段。
¥To make sure Universal Links work in your app, you also need to setup Associated Domains on your server.
混合 React Native 和原生 iOS 应用
¥Hybrid React Native and native iOS Applications
如果你在混合应用中使用 React Navigation - 一个同时具有 Swift/ObjC 和 React Native 部分的 iOS 应用 - 你可能在 Podfile 中缺少 RCTLinkingIOS 子规范,该子规范默认安装在新的 React Native 项目中。要添加此内容,请确保你的 Podfile 如下所示:
¥If you're using React Navigation within a hybrid app - an iOS app that has both Swift/ObjC and React Native parts - you may be missing the RCTLinkingIOS subspec in your Podfile, which is installed by default in new React Native projects. To add this, ensure your Podfile looks like the following:
 pod 'React', :path => '../node_modules/react-native', :subspecs => [
    . . . // other subspecs
    'RCTLinkingIOS',
    . . .
  ]
在 Android 上设置
¥Setup on Android
要在 Android 中配置外部链接,你可以在清单中创建新的意图。
¥To configure the external linking in Android, you can create a new intent in the manifest.
最简单的方法是使用 uri-scheme 包:npx uri-scheme add example --android。
¥The easiest way to do this is with the uri-scheme package: npx uri-scheme add example --android.
如果要手动添加,打开 SimpleApp/android/app/src/main/AndroidManifest.xml,进行如下调整:
¥If you want to add it manually, open up SimpleApp/android/app/src/main/AndroidManifest.xml, and make the following adjustments:
-
将
MainActivity的launchMode设置为singleTask,以便接收现有MainActivity上的意图(这是默认值,因此你可能不需要实际更改任何内容)。¥Set
launchModeofMainActivitytosingleTaskin order to receive intent on existingMainActivity(this is the default, so you may not need to actually change anything). -
使用
VIEW类型操作在MainActivity条目中添加新的intent-filter:¥Add the new
intent-filterinside theMainActivityentry with aVIEWtype action:
<activity
    android:name=".MainActivity"
    android:launchMode="singleTask">
    <intent-filter>
        <action android:name="android.intent.action.MAIN" />
        <category android:name="android.intent.category.LAUNCHER" />
    </intent-filter>
    <intent-filter>
        <action android:name="android.intent.action.VIEW" />
        <category android:name="android.intent.category.DEFAULT" />
        <category android:name="android.intent.category.BROWSABLE" />
        <data android:scheme="example" />
    </intent-filter>
</activity>
与 iOS 上的通用链接类似,你还可以通过 验证 Android 应用链接 使用域名将应用与 Android 上的网站关联起来。首先,你需要配置 AndroidManifest.xml:
¥Similar to Universal Links on iOS, you can also use a domain to associate the app with your website on Android by verifying Android App Links. First, you need to configure your AndroidManifest.xml:
-
将
android:autoVerify="true"添加到你的<intent-filter>条目中。¥Add
android:autoVerify="true"to your<intent-filter>entry. -
将域的
scheme和host添加到<intent-filter>内的新<data>条目中。¥Add your domain's
schemeandhostin a new<data>entry inside the<intent-filter>.
添加它们后,它应该看起来像这样:
¥After adding them, it should look like this:
<activity
    android:name=".MainActivity"
    android:launchMode="singleTask">
    <intent-filter>
        <action android:name="android.intent.action.MAIN" />
        <category android:name="android.intent.category.LAUNCHER" />
    </intent-filter>
    <intent-filter>
        <action android:name="android.intent.action.VIEW" />
        <category android:name="android.intent.category.DEFAULT" />
        <category android:name="android.intent.category.BROWSABLE" />
        <data android:scheme="example" />
    </intent-filter>
    <intent-filter android:autoVerify="true">
        <action android:name="android.intent.action.VIEW" />
        <category android:name="android.intent.category.DEFAULT" />
        <category android:name="android.intent.category.BROWSABLE" />
        <data android:scheme="http" />
        <data android:scheme="https" />
        <data android:host="app.example.com" />
    </intent-filter>
</activity>
然后,你需要通过托管数字资源链接 JSON 文件在你的网站和意图过滤器之间进行 声明关联。
¥Then, you need to declare the association between your website and your intent filters by hosting a Digital Asset Links JSON file.
配置 React Navigation
¥Configuring React Navigation
要处理深度链接,你需要配置 React Navigation 以使用 scheme 来解析传入的深度链接:
¥To handle deep links, you need to configure React Navigation to use the scheme for parsing incoming deep links:
- Static
- Dynamic
const linking = {
  prefixes: [
    'example://', // Or `Linking.createURL('/')` for Expo apps
  ],
};

function App() {
  return <Navigation linking={linking} />;
}
const linking = {
  prefixes: [
    'example://', // Or `Linking.createURL('/')` for Expo apps
  ],
};

function App() {
  return (
    <NavigationContainer linking={linking} fallback={<Text>Loading...</Text>}>
      {/* content */}
    </NavigationContainer>
  );
}
如果你使用通用链接,则还需要将你的域添加到前缀中:
¥If you are using universal links, you need to add your domain to the prefixes as well:
const linking = {
  prefixes: [
    'example://', // Or `Linking.createURL('/')` for Expo apps
    'https://app.example.com',
  ],
};
有关如何在 React Navigation 中配置链接的更多详细信息,请参见 配置链接。
¥See configuring links to see further details on how to configure links in React Navigation.
测试深层链接
¥Testing deep links
在测试深层链接之前,请确保在模拟器/模拟器/设备中重建并安装应用。
¥Before testing deep links, make sure that you rebuild and install the app in your emulator/simulator/device.
如果你在 iOS 上进行测试,请运行:
¥If you're testing on iOS, run:
npx react-native run-ios
如果你在 Android 上进行测试,请运行:
¥If you're testing on Android, run:
npx react-native run-android
如果你使用 Expo 管理的工作流程并在 Expo 客户端上进行测试,则无需重建应用。但是,你需要使用运行 expo start 时打印的正确地址和端口,例如 exp://127.0.0.1:19000/--/。
¥If you're using Expo managed workflow and testing on Expo client, you don't need to rebuild the app. However, you will need to use the correct address and port that's printed when you run expo start, e.g. exp://127.0.0.1:19000/--/.
如果你想在 Expo 应用中使用自定义方案进行测试,则需要通过运行 expo build:ios -t simulator 或 expo build:android 来重建独立应用并安装生成的二进制文件。
¥If you want to test with your custom scheme in your Expo app, you will need rebuild your standalone app by running expo build:ios -t simulator or expo build:android and install the resulting binaries.
使用 npx uri-scheme 进行测试
¥Testing with npx uri-scheme
uri-scheme 包是一个命令行工具,可用于测试 iOS 和 Android 上的深层链接。它可以按如下方式使用:
¥The uri-scheme package is a command line tool that can be used to test deep links on both iOS & Android. It can be used as follows:
npx uri-scheme open [your deep link] --[ios|android]
例如:
¥For example:
npx uri-scheme open "example://chat/jane" --ios
或者如果使用 Expo 客户端:
¥Or if using Expo client:
npx uri-scheme open "exp://127.0.0.1:19000/--/chat/jane" --ios
在 iOS 上使用 xcrun 进行测试
¥Testing with xcrun on iOS
可以使用 xcrun 命令如下来测试与 iOS 模拟器的深度链接:
¥The xcrun command can be used as follows to test deep links with the iOS simulator:
xcrun simctl openurl booted [your deep link]
例如:
¥For example:
xcrun simctl openurl booted "example://chat/jane"
在 Android 上使用 adb 进行测试
¥Testing with adb on Android
可以按如下方式使用 adb 命令来测试与 Android 模拟器或连接设备的深度链接:
¥The adb command can be used as follows to test deep links with the Android emulator or a connected device:
adb shell am start -W -a android.intent.action.VIEW -d [your deep link] [your android package name]
例如:
¥For example:
adb shell am start -W -a android.intent.action.VIEW -d "example://chat/jane" com.simpleapp
或者如果使用 Expo 客户端:
¥Or if using Expo client:
adb shell am start -W -a android.intent.action.VIEW -d "exp://127.0.0.1:19000/--/chat/jane" host.exp.exponent
与其他工具集成
¥Integrating with other tools
除了使用 React Native 的 Linking API 实现深度链接和通用链接之外,你可能还需要集成其他工具来处理传入的链接,例如推送通知。 - 以便点击通知可以打开应用并跳转到特定屏幕。
¥In addition to deep links and universal links with React Native's Linking API, you may also want to integrate other tools for handling incoming links, e.g. Push Notifications - so that tapping on a notification can open the app to a specific screen.
为了实现这一点,你需要重写 React Navigation 订阅传入链接的方式。为此,你可以提供自己的 getInitialURL 和 subscribe 函数。
¥To achieve this, you'd need to override how React Navigation subscribes to incoming links. To do so, you can provide your own getInitialURL and subscribe functions.
以下是与 expo-notifications 集成的示例:
¥Here is an example integration with expo-notifications:
- Static
- Dynamic
const linking = {
  prefixes: ['example://', 'https://app.example.com'],

  // Custom function to get the URL which was used to open the app
  async getInitialURL() {
    // First, handle deep links
    const url = await Linking.getInitialURL();

    if (url != null) {
      return url;
    }

    // Handle URL from expo push notifications
    const response = await Notifications.getLastNotificationResponseAsync();

    return response?.notification.request.content.data.url;
  },

  // Custom function to subscribe to incoming links
  subscribe(listener) {
    // Listen to incoming links for deep links
    const linkingSubscription = Linking.addEventListener('url', ({ url }) => {
      listener(url);
    });

    // Listen to expo push notifications when user interacts with them
    const pushNotificationSubscription =
      Notifications.addNotificationResponseReceivedListener((response) => {
        const url = response.notification.request.content.data.url;

        listener(url);
      });

    return () => {
      // Clean up the event listeners
      linkingSubscription.remove();
      pushNotificationSubscription.remove();
    };
  },
};
const linking = {
  prefixes: ['example://', 'https://app.example.com'],

  // Custom function to get the URL which was used to open the app
  async getInitialURL() {
    // First, handle deep links
    const url = await Linking.getInitialURL();

    if (url != null) {
      return url;
    }

    // Handle URL from expo push notifications
    const response = await Notifications.getLastNotificationResponseAsync();

    return response?.notification.request.content.data.url;
  },

  // Custom function to subscribe to incoming links
  subscribe(listener) {
    // Listen to incoming links for deep links
    const linkingSubscription = Linking.addEventListener('url', ({ url }) => {
      listener(url);
    });

    // Listen to expo push notifications when user interacts with them
    const pushNotificationSubscription =
      Notifications.addNotificationResponseReceivedListener((response) => {
        const url = response.notification.request.content.data.url;

        listener(url);
      });

    return () => {
      // Clean up the event listeners
      linkingSubscription.remove();
      pushNotificationSubscription.remove();
    };
  },

  config: {
    // Deep link configuration
  },
};
与上面的示例类似,你可以集成任何提供获取初始 URL 并使用 getInitialURL 和 subscribe 选项订阅新传入 URL 的方法的 API。
¥Similar to the above example, you can integrate any API that provides a way to get the initial URL and to subscribe to new incoming URLs using the getInitialURL and subscribe options.